
One platform — standardized, built and operated by many.
One platform — standardized, built and operated by many.
We had quite a few sunny days in the southwest of Germany and my mini PV system was running at full load. Reason enough to think about where to put the excess energy, I decided to have yet another look at current state of the Cloud in a box image that is provided by OSISM.

But one by one and from the start…
The initial impetus dates back to mid 2022 and has been discussed several times in the Sovereign Cloud Stack community. The basic idea is to develop a single-node image of our SCS reference implementation that can easily be installed on a mediocre computer system. This allows us to showcase the SCS reference implementation at conferences on the one hand and to perform hands-on experiments with our technology on the other hand. Basically, it’s like a sandbox for nerds that sits in your basement or under your desk. 🤓
Shortly after Alexander joined our team, he took the lead and organized some test systems for our community. Thanks again for your great effort! 🙏
We currently have some of the following configurations distributed within our community which allows us to develop and to test the anticipated Cloud in a box image:
The hardware comes in a nice ATX chassis by Fractal Design and therefore has definitely no reason to be shy at events. And it’s impressively silent.
The first time ever we had the chance to put our fingers on this brand new toy was at the first SCS Community Hackathon happening November last year in Cologne. Kurt brought along his system and we were able to install a very first MVP initially developed by OSISM some weeks earlier.
We tried to connect the system to the Wifi in the room – in the end we were lucky to have brought a switch that we could get some wired connection and with the help of a USB network adapter from some plusserver colleagues in the data center could also connect the laptops to the same switch.
Our OSISM friends had their own hardware, and it differed in a number of ways: Their SSDs were attached via SATA (/dev/sda),
while the SCS CiaB systems uses NVMe storage (/dev/nvme0n1). Autodetection is not as straight forward during this installation
stage, so Christian Berendt on the fly told his build system to spit out a specific image targeting the NVMe storage for
installation. Being at it, we added auto-detection for the network card, as it also was named differently.
After two attempts, the installation process would run through, and the server indeed displayed the friendly (text mode) login prompt. There was some documentation available, documenting the preset password and how to connect to the servers internal network via a wireguard tunnel. Hacking on the system together we also learned that using the same wireguard config files on two Linux laptops to connect lead to unstable connections. The reason was simple: The client IP address is configured in the config file and two systems using the same address does not lead to a happy networking experience. So that was rectified and documented.
I initially had a first look at my own machine at some point between Christmas and New Year’s Eve. Lucky me, I already have a small but decent Homelab located in my basement and therefore the necessary uplink was already given. Even more lucky, I had an older screen currently available, that I wanted to attach to the new box. But wait… does this household actually not own a single VGA cable? Even though Marie Kondo says she has kind of given up on tidying at home since the birth of her third child, I somehow must have emptied my cable box earlier the year (»Sure, I won’t need this old VGA cable ever again!«).
💡 Fortunately, the built-in Supermicro motherboard has an excellent IPMI (Thanks, Alex!) which allowed me to use the system without any screen attached… and even without having to sit in my basement during December!
Having given a hostname for my system, I was able to access my Cloud in a box via http://ciab.fritz.box/.

The default username and password of the BMC turn out to be ADMIN/ADMIN and whoosh… there you go!
Installing the CiaB node image was fairly self-explaining. I provisioned the autoinstall image ubuntu-autoinstall-cloud-in-a-box-2.iso on a USB stick using Etcher, rushed down the stairs to plug in the stick and hurried straight back to my desk in order to finally start the boot sequence. The image contains a minimal OS that after a first boot starts to pull in all needed packets and to install the real Cloud in a box image. Booting over a second time – after having unplugged the USB stick –, I had a ready to be used cloud and container stack in by basement. Yay! 🎉
Time flashed by and unfortunately I hadn’t any chance to take a deeper look into my new cloud companion throughout the following weeks.
The Sovereign Cloud Stack Community identified various caveats to the Cloud in a box image:
OSISM provided excellent service and addressed the reported issues right away. Reason enough for me to once again have a look at the current state of the Cloud in a box. But I must confess that I was little too lazy to rush down to my basement again and instead decided to take a deeper look at the Supermicro BMC.
If you take a closer look at the BMC’s capabilities, you will find the option to mount an ISO file. Hooray, laziness triumphs!
The documentation states that an SMBv1 share is required to host the required ISO file. Thanks to container technology, setting up a Samba share is a simple one-liner.
mkdir -p iso
wget -P iso https://minio.services.osism.tech/node-image/ubuntu-autoinstall-cloud-in-a-box-2.iso
sudo docker run -it --name samba -p 139:139 -p 445:445 -v `pwd`/iso:/mount -d dperson/samba -p -S -s "iso;/mount"
Please note the parameter -S above, which explicitly disables SMB2 as minimal version. It won’t work otherwise. See https://hub.docker.com/r/dperson/samba for further information on how to configure the Samba share.
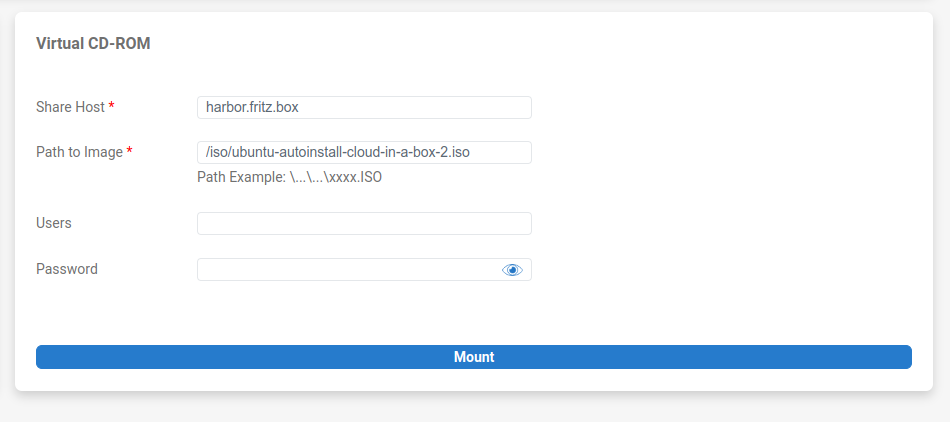
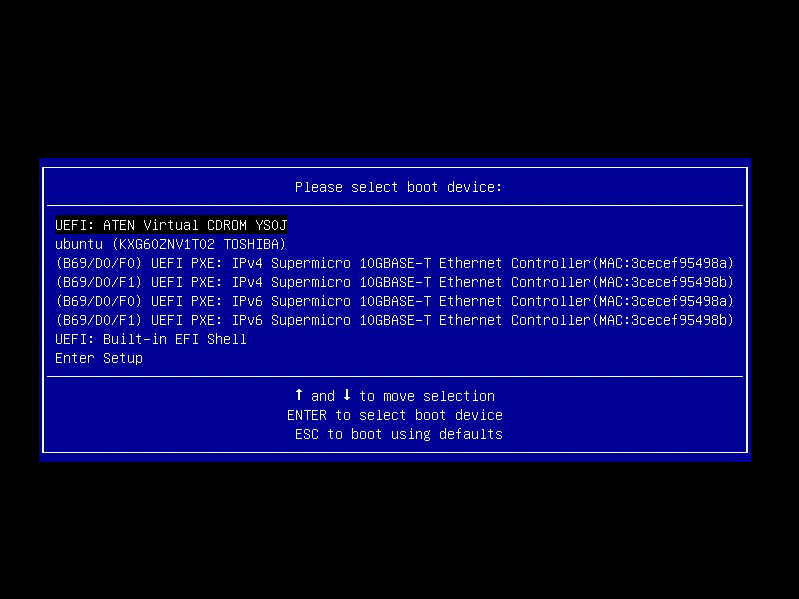
After mounting the ISO in the BMC frontend, the just created virtual drive can be selected as boot device by pressing the F11 key during startup.
The installation routine takes some time until osism has done it’s magic. Keep in mind that the mounted ISO needs to be ejected and the system powered on again via the BMC after the initial seeding of the cloud-in-a-box system.
You may wonder how to connect to your new cloud after initialization? This is super easy thanks to the automatically generated wireguard profile that waits to be fetched within dragon’s home directory.
sudo apt install wireguard-tools
scp dragon@192.168.2.93:~/wireguard-client.conf .
sudo cp wireguard-client.conf /etc/wireguard/ciab.conf
wg-quick up ciab
Your laptop is now connected to the client network 192.168.17.0/24 with a route to the
admin network of your cloud at 192.168.16.0/24 (and 192.168.112.0/24) and you can connect to all the
services running as containers of your cloud. These are also accessible via DNS names in the in-a-box.cloud
domain that OSISM has registered for us and for which the TLS certificates are registered.
Read more about how to use your brand new cloud-in-a-box system in the second part of this blog post: Let’s put the cloud in a box #2